
Tags
2D, 3D, Augmented Reality, Camera Calibration, camera matrix, distortion coefficients, extrinsic parameters, intrinsic parameters, Lego, OpenCV, Pose Estimation, Python, Python Tools for Visual Studio, Webcam
Wouldn’t it be fine and dandy to add augmented reality to a Lego scene. You say No, but stick with me on this.
Before we get going though, we need to calibrate our webcam and prove some basic 3D effects.
Camera Calibration
Why calibrate our webcam? Well, we need to sort any picture distortion – such as straight lines appearing curved, or some areas of image appearing closer than expected – before we start to render our 3D objects. The OpenCV Camera Calibration article provides all the detail.
Here’s my checklist of what I’ll be using:
- Windows 7 PC
- Python Tools for Visual Studio
- Logitech HD720p webcam
- Printout of a ‘chessboard’ grid
- An unnerving aptitude for tedium
Okay, here’s my grid printout through the eye of my webcam:

I used Microsoft Word tables to construct the grid, but sensible people would probably print the OpenCV pattern online.
The idea is that we will project 3D images onto this grid, which will be placed within a Lego scene. And when I say Lego scene, I mean a couple of Lego policemen with a Lego motorbike and Lego ambulance. Probably a Lego nurse administering CPR. That sort of thing.

So let the calibration begin! First up, I want to obtain 10 sample images of my grid at different angles and locations (pretty much mimicking the OpenCV sample images at sources/samples/cpp/left01.jpg – left14.jpg).
Here’s the code I used to display and save snaps from my webcam:
from webcam import Webcam
import cv2
from datetime import datetime

webcam = Webcam()
webcam.start()

while True:

    # get image from webcam
    image = webcam.get_current_frame()

    # display image
    cv2.imshow('grid', image)
    cv2.waitKey(3000)

    # save image to file, if pattern found
    ret, corners = cv2.findChessboardCorners(cv2.cvtColor(image,cv2.COLOR_BGR2GRAY), (7,6), None)

    if ret == True:
        filename = datetime.now().strftime('%Y%m%d_%Hh%Mm%Ss%f') + '.jpg'
        cv2.imwrite("pose/sample_images/" + filename, image)
You’ll notice that I am only saving images that have corners detected (if we can’t find corners on the grid, then the snap is of no use to us).
And here’s my Webcam class – used in the code above – which runs in a thread:
import cv2
from threading import Thread

class Webcam:

    def __init__(self):
        self.video_capture = cv2.VideoCapture(0)
        self.current_frame = self.video_capture.read()[1]

    # create thread for capturing images
    def start(self):
        Thread(target=self._update_frame, args=()).start()

    def _update_frame(self):
        while(True):
            self.current_frame = self.video_capture.read()[1]

    # get the current frame
    def get_current_frame(self):
        return self.current_frame
Note: in previous OpenCV projects I found that the webcam images were lagging i.e. the frame that displayed on screen was not the current frame, instead up to 5 frames behind. To solve this, my Webcam class runs in a thread.
I used the free Python Tools for Visual Studio to run the code on my Windows 7 PC.
Here’s one of the 10 sample images:

Next up, we loop through our 10 images and build arrays to store our object points (3D points in real world space) and image points (2D points in image plane) of the grid corners. The OpenCV Camera Calibration article provides the code.
Note: I had to amend the article code slightly to work with my version of OpenCV 2.4.9. Some of the OpenCV functions were assigning a return value of None to a variable, and when the variable was next used the program blew up (yes, my PC actually caught fire). An example of how to fix this: remove the corners2 variable, as the cornerSubPix function will do its work on the corners parameter directly.
corners2 = cv2.cornerSubPix(gray,corners,(11,11),(-1,-1),criteria)
Great. Let’s take a peek at one of our sample images with the grid corners drawn upon it (courtesy of the cv2.drawChessboardCorners function):

Okay, now that we have our arrays to store our object and image points, let’s go calibrate that camera:
# calibrate webcam and save output
ret, mtx, dist, rvecs, tvecs = cv2.calibrateCamera(objpoints, imgpoints, gray.shape[::-1], None, None)
np.savez("pose/webcam_calibration_ouput", ret=ret, mtx=mtx, dist=dist, rvecs=rvecs, tvecs=tvecs)
cv2.calibrateCamera consumes our object and image points, yielding parameters relating to distortion (these are known as the distortion coefficients) along with intrinsic parameters (the camera matrix) and extrinsic parameters (for translating 3D coordinates). We save all these parameters to disk – they will help us create 3D effects.
The OpenCV Camera Calibration article also provides code to test out our calibration efforts. Here’s a brand new image of the grid – our future Lego scene – taken from my webcam:

And here’s it once we’ve applied the cv2.undistort function:

I would take a keen eye to spot the difference, but a flip between the images shows a correction in the grid squares. And we can use the Re-projection Error calculation in the OpenCV article to help refine our calibration.
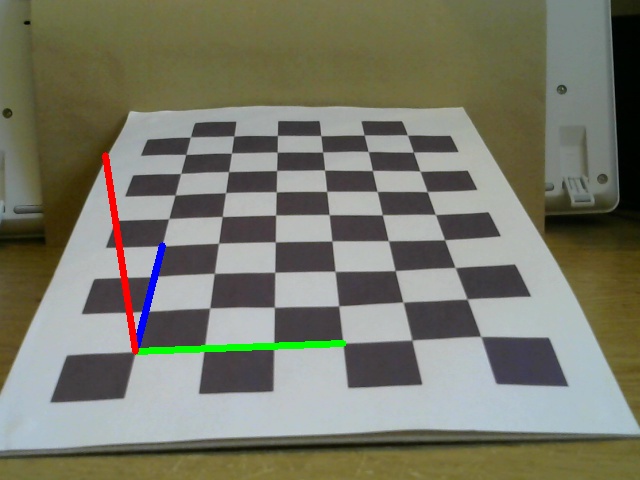
Pose Estimation
Now that we have our webcam calibrated, let’s create some 3D effects! The OpenCV Pose Estimation article provides all the detail (including code).
Here’s the axis points projected onto our future Lego scene:
And here’s a cube, which could become a virtual jail for our Lego criminals:

Oh, the Lego policemen are salivating at the thought of a spanking new building to bang up all those vagabonds.
Well, that’s that. Time to turn a few pages of The Inscrutable Diaries Of Rodger Saltwash and unwind. Then it’s back to the drawing board, and turning those 3D effects into mind-shattering Lego augmented reality. Watch this space!

Hello Rdmilligan, thanks for your post. I tried to follow your procedure but at ret, corners = cv2.findChessboardCorners(gray, (7,6), None) I failed. I used your image, and be able to convert into gray image, but ret just keep failing to detect any corners. Can you give some help?
Hi, try the second chessboard image in the post – I’ve been able to get ret=True corners=array(…) for this sample image.
Thanks a lot, Rdmiligan. Your second image worked. I got the ret = true and the corners. However, I used the openCV code:
# If found, add object points, image points (after refining them)
if ret == True:
objpoints.append(objp)
corners2 = cv2.cornerSubPix(gray,corners,(11,11),(-1,-1),criteria)
imgpoints.append(corners2)
# Draw and display the corners
img = cv2.drawChessboardCorners(img, (7,6), corners2, ret)
cv2.imshow(‘img’,img)
cv2.waitKey(500)
I have two new problems: 1) the (-215) size.width>0 && size.height>0 in function cv::imshow error and 2) the grid image window freezes and the program crashed.
Thanks again.
Hi Kongwen,
As mentioned in my post, I had to amend the OpenCV Camera Calibration tutorial code to work with my version of OpenCV 2.4.9. You are getting these errors because the corners2 and img variables are None – use this code instead:
cv2.cornerSubPix(gray,corners,(11,11),(-1,-1),criteria)
imgpoints.append(corners)
# Draw and display the corners
cv2.drawChessboardCorners(img, (7,6), corners,ret)
cv2.imshow(‘img’,img)
cv2.waitKey(500)
I can draw the chessboard on the images saved from your image capture code and by playing around I can do the same on live webcam video. What I can’t figure out is how to use the 3 lines of code to calibrate the camera.
When you say you can “draw the chessboard” do you mean you can draw e.g. a 3D cube on the chessboard (you’d need the calibration file for this). To create the calibration file, you’ll need to use the code in the OpenCV article to provide the necessary parameters: cv2.calibrateCamera(objpoints, imgpoints, gray.shape[::-1], None, None). For example, here’s the calibration file I created from a Logitech HD 720p webcam.
Hi Rdmilligan, i wonder if it is necessary to calibrate the Raspberry Pi camera module? thanks.
Hi there. The calibration process spits out the .npz file used in pose estimation. Here’s mine, calibrated to a Logitech HD720p webcam and used in SaltwashAR (Python Augmented Reality application).
Hi, the code is just for one camera, right? I have to use it for each cameraor not? I am really new about it. I don’t know how can I use it for stereo camera. thank you for your help
Hi. Yeah, I am using the code for one webcam. There is an OpenCV stereoCalibrate function though.
Great Article!!